New York Black and White Cookies
Last Updated on February 9, 2026 by Kiersten James
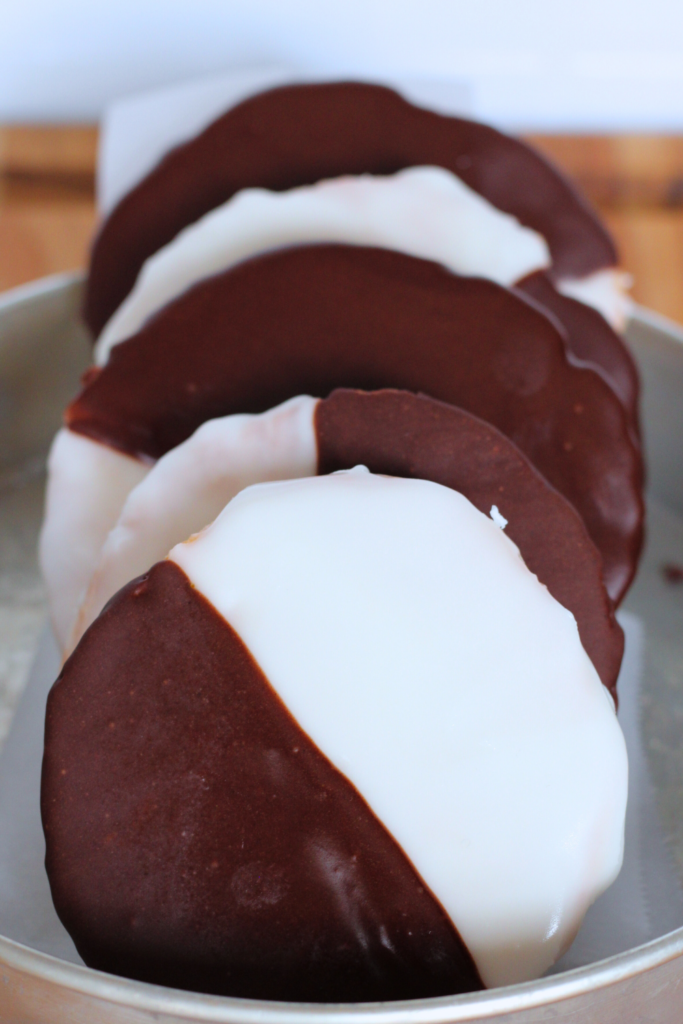
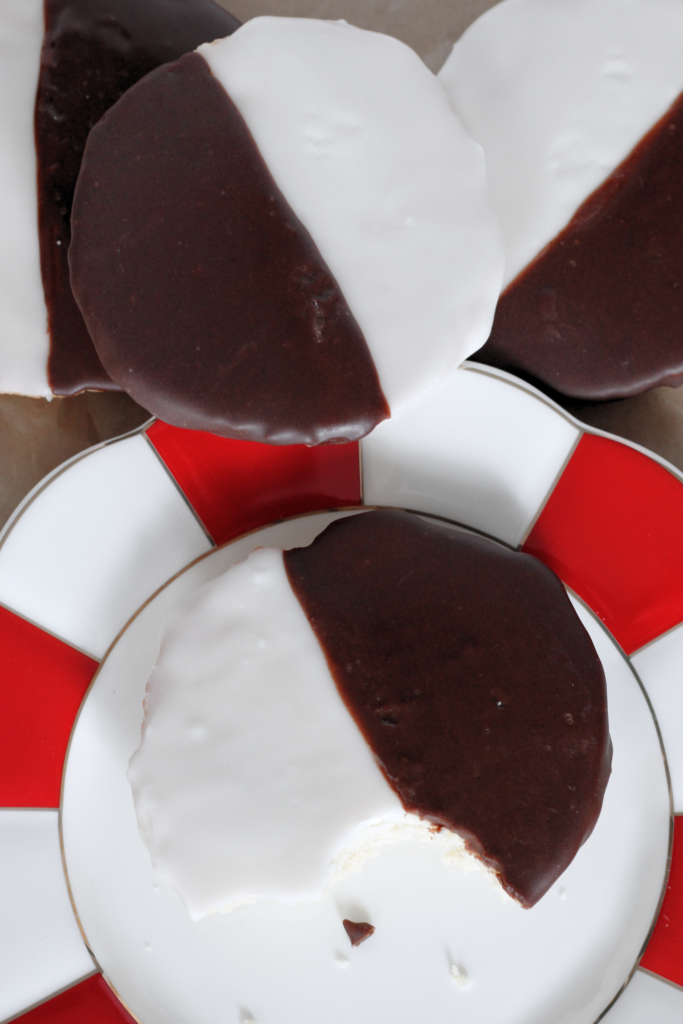
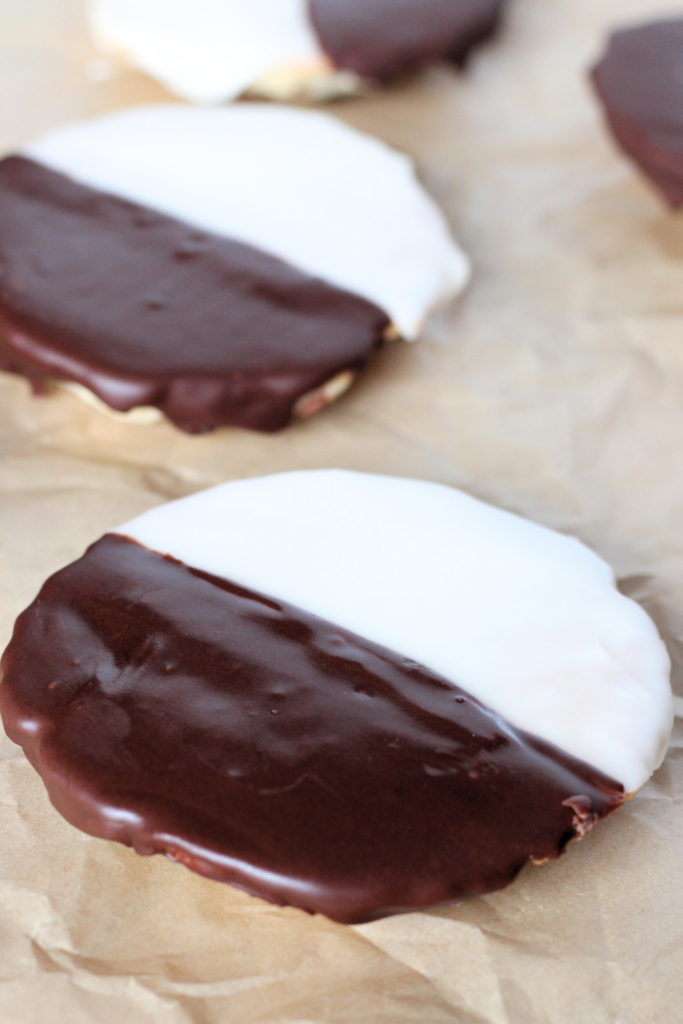
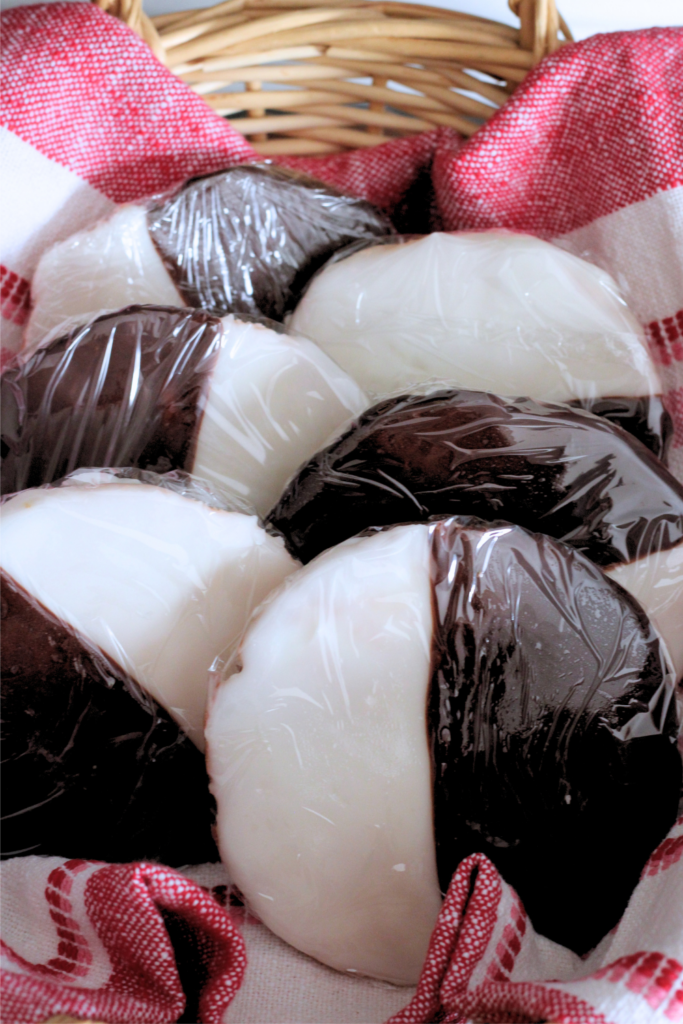
These gigantic, soft New York black and white cookies are a staple in tri-state bakeries, bagel stores, and diners.
If you grew up in New York, you already know that you don’t go hunting for a black and white cookie at a bakery. You get one at a bagel store. Or a Greek diner.
They’re usually sitting right by the register, wrapped in plastic, next to crumb cake and massively oversized muffins.
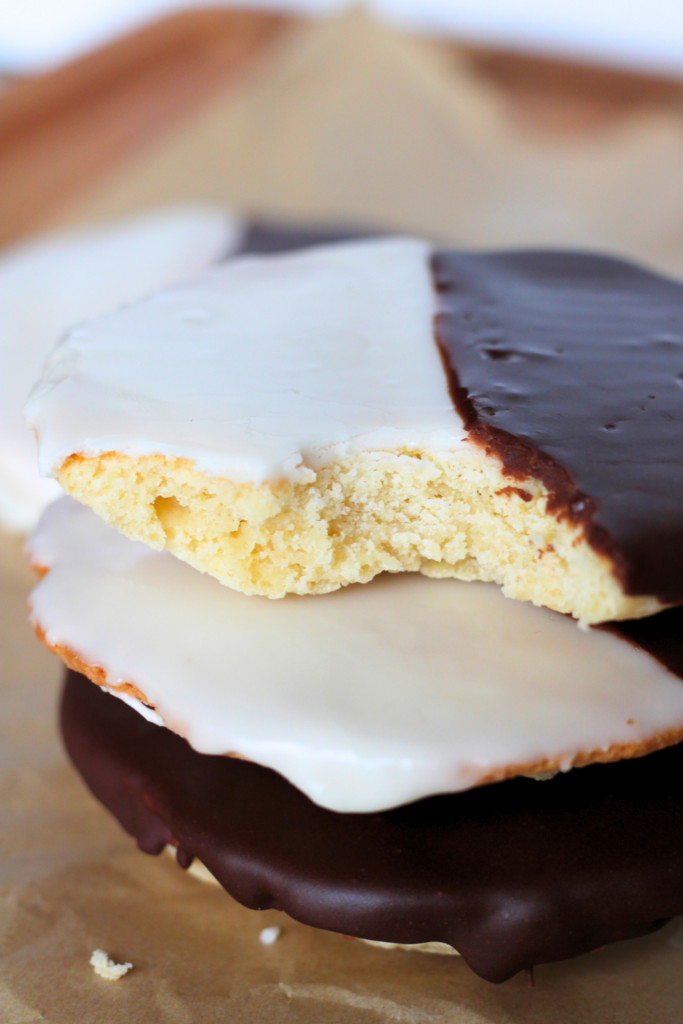
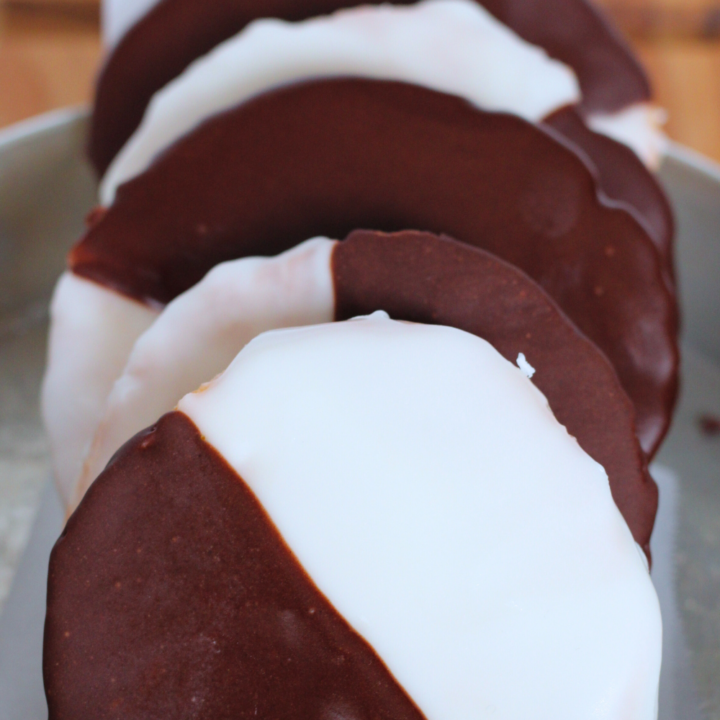
A good black and white cookie is gigantic, thick, and soft. It’s not crisp. It’s not chewy like a chocolate chip cookie, and it’s definitely not dry.
It’s closer to cake than cookie and has a smooth chocolate and vanilla glaze that sets just enough to crack when you bite into it.
That’s what this recipe is.
Not a bakery version. Not a “holiday twist.” Just a real New York black and white cookie that we’ve all probably eaten a thousand times without even thinking about it.
Why You’ll Love These New York Black and White Cookies
- These are the real deal New York black and white cookies
- Easiest recipe ever – if you can make muffin batter, you can make these
- Light vanilla flavor that isn’t overly sweet
- The smooth, shiny glaze sets without getting hard and remains creamy underneath
- These sell for at least $5 each; bring them to your next gathering, and you’ll basically be a celebrity.
Quick Allergy Check!
For my beloved friends who have different dietary needs, I see you and want you to feel safe.
These New York black and white cookies contain the following allergens:
- Eggs
- Wheat
- Dairy
Ingredients You’ll Be Using:
All-purpose flour: gives structure without making the cookies dense.
Butter: adds richness without flattening the dough.
Granulated sugar: keeps the cookie lightly sweet so the icing doesn’t feel heavy.
Egg: binds the dough and helps create that soft, cake-like texture.
Vanilla: the main flavor here. Black and white cookies should taste clean and simple.
Sour cream: absolutely essential. It keeps the cookies moist and gives that subtle tang you expect from a real NY black and white cookie.
Confectioners’ sugar: creates a smooth glaze that spreads easily.
Milk: thins the glaze without making it runny.
Light corn syrup: gives the glaze that classic shine and keeps it from drying rock-hard.
Cocoa powder: converts a portion of the vanilla glaze to chocolate for the “black” half.
Tips for the Best New York Black and White Cookies Ever
Keep the Cookies Pale
These are not supposed to brown like regular cookies. If they start turning golden all over, they’ve already gone a little too far.
The Batter Should Be Thick
It will resemble muffin batter, not scoopable chocolate chip dough. It should hold its shape on the pan without spreading on its own.
Do Not Attempt to Glaze Them Until They’re Completely Cold
If the cookies are even slightly warm, the glaze will slide right off. Let them cool fully so the glaze sets clean and smooth. I put the entire cooling rack in my refrigerator while I’m doing other things to make sure they are cool.
Why did my cookies spread too much?
Your butter was probably too soft. Soft is fine, shiny and greasy is not.
Why are my cookies dry?
They stayed in the oven too long. Black and white cookies should stay very pale – almost white – with soft centers.
Why doesn’t my icing look smooth and shiny?
That little bit of corn syrup matters. You cannot omit or skip it. Without it, the icing dries dull instead of looking like the classic New York version.
To Freeze & Make ahead:
Individually wrap each baked, unfrosted cookie in plastic, then place wrapped cookies into a freezer storage bag. Freeze for up to 2 months.
Once thawed, glaze fresh for the best texture and appearance.
How to Make New York Black and White Cookies
Equipment I Use:
- Stand Mixer
- Angled Icing Spatula
- Paddle Attachment
- LIFE CHANGING flour funnel my husband got for me
- Cookie Scoop (medium 2 tablespoon size)
- Baking Sheet
Ingredients:
Cookies:
- 1 3/4 cups all-purpose flour
- 1/2 teaspoon baking powder
- 1/4 teaspoon baking soda
- 1/2 teaspoon salt
- 10 tablespoons unsalted butter, softened
- 1 cup granulated sugar
- 1 large egg
- 2 teaspoons vanilla extract
- 1/3 cup sour cream
Glaze:
- 5 cups confectioners’ sugar
- 9 tablespoons milk
- 2 tablespoons light corn syrup
- 1 teaspoon vanilla
- 1/2 teaspoon salt
- 3 tablespoons unsweetened cocoa powder
Overview:
Set up your oven: Move the racks to the middle and preheat the oven to 350 degrees F. Line 2 cookie sheets with parchment paper or use a silicone baking mat.
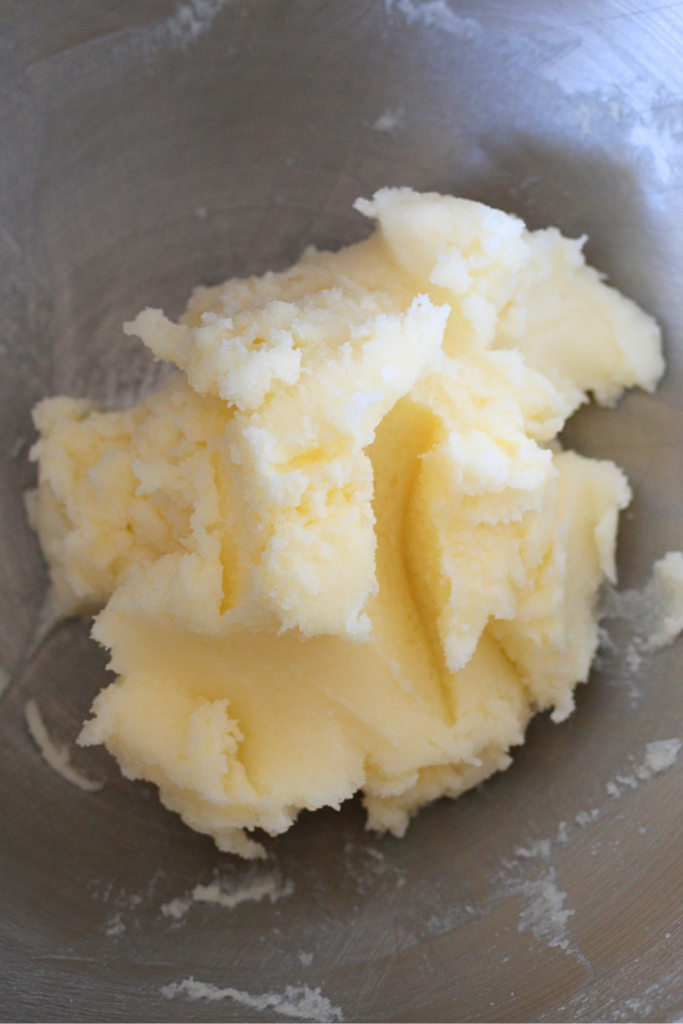
Cream the sugar and fats: Using the paddle attachment on a stand mixer, cream together the butter and granulated sugar on medium-high speed until light and fluffy – about 3 minutes.
Whisk the dry ingredients: In a separate bowl, whisk together the flour, baking powder, baking soda, and salt. Set aside.
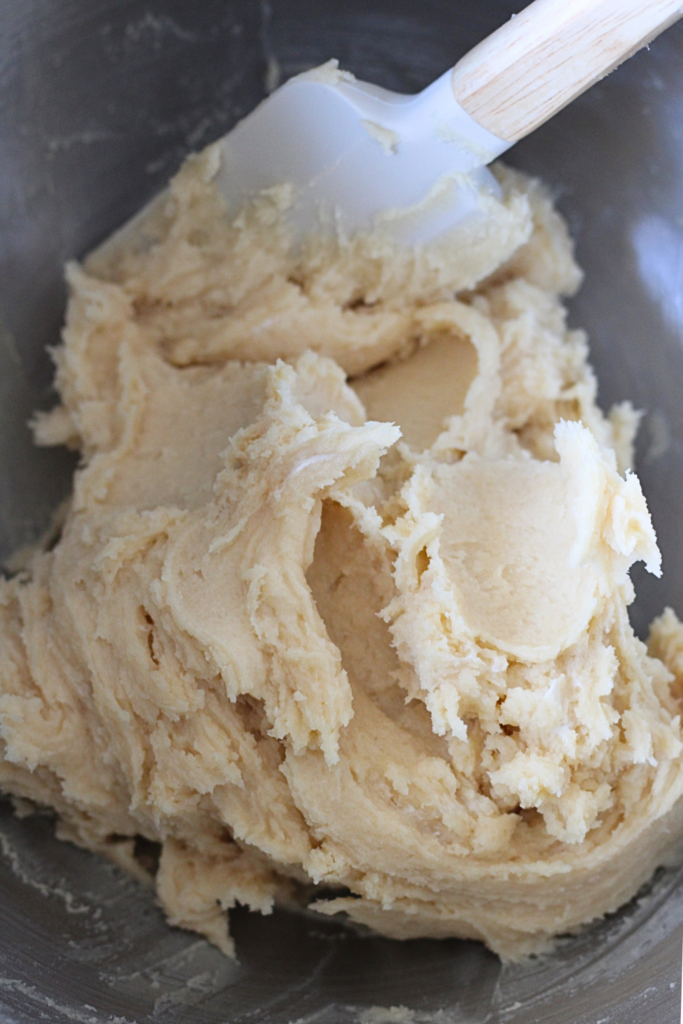
Mix in the egg and vanilla: Turn the mixer off, add the egg and vanilla, and mix on low speed until well combined. Scrape down the bowl here and there, as needed.
Alternate adding flour and sour cream: Next, add the dry flour mixture a little at a time, alternating with the sour cream. Do this on the lowest speed just until no clumps of white flour remain. Do not overmix; turn the mixer off as soon as the flour is no longer white.
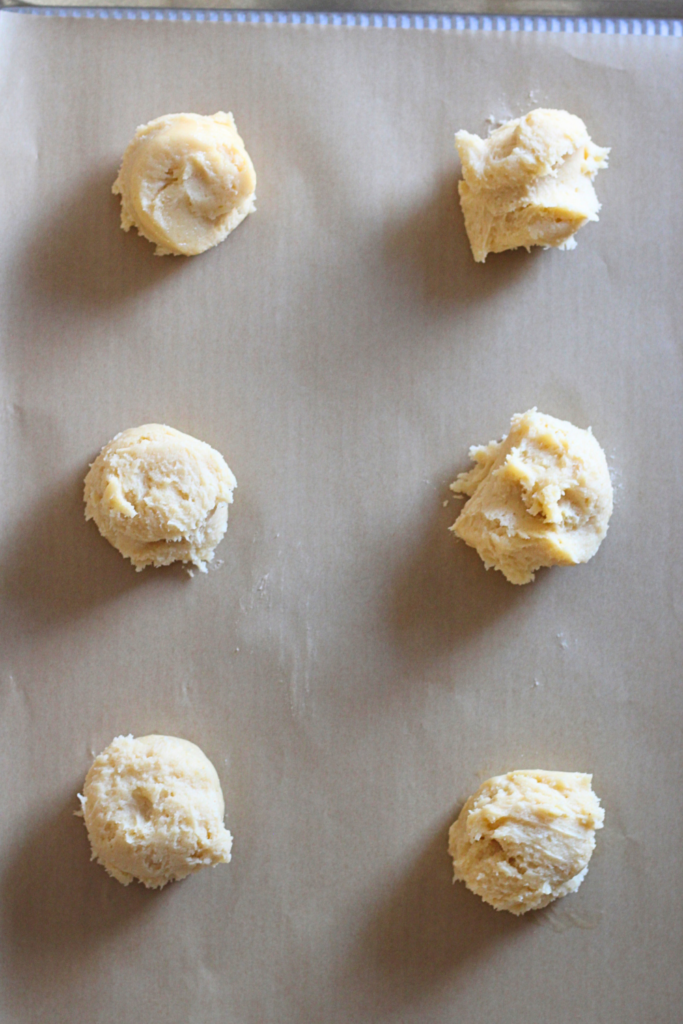
Scoop the dough: Grease a 1/4 cup-sized dry measuring cup. Scoop mounds of dough onto the cookie sheet. The dough will be very thick but appear more like a muffin batter than a true cookie dough – this is correct.
Place each mound about 3 to 4″ apart from each other, and no more than 6 mounds on a baking sheet. They will spread out a lot.
Bake & Rest: Bake the cookies at 350 degrees F for about 17 minutes. Make sure to rotate the cookie sheet in the oven halfway through baking at 9 minutes.
They will have lightly browned edges, look underbaked in the centers, and be very pale when you take them out. This is what you want. The cookies will finish baking on the cookie sheet after they are removed from the oven.
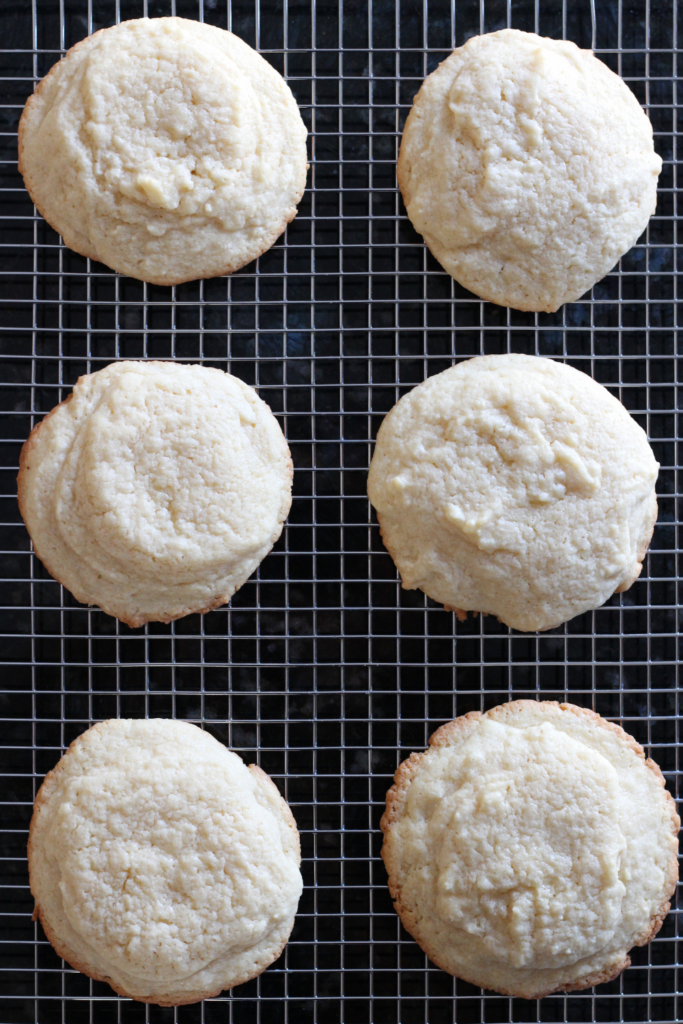
Allow the cookies to rest undisturbed on the cookie sheet for 10 minutes. Transfer to a wire cooling rack after that time and allow to cool completely. If you want to glaze them sooner rather than later, place the cooling rack in the refrigerator.
Make the Glaze:
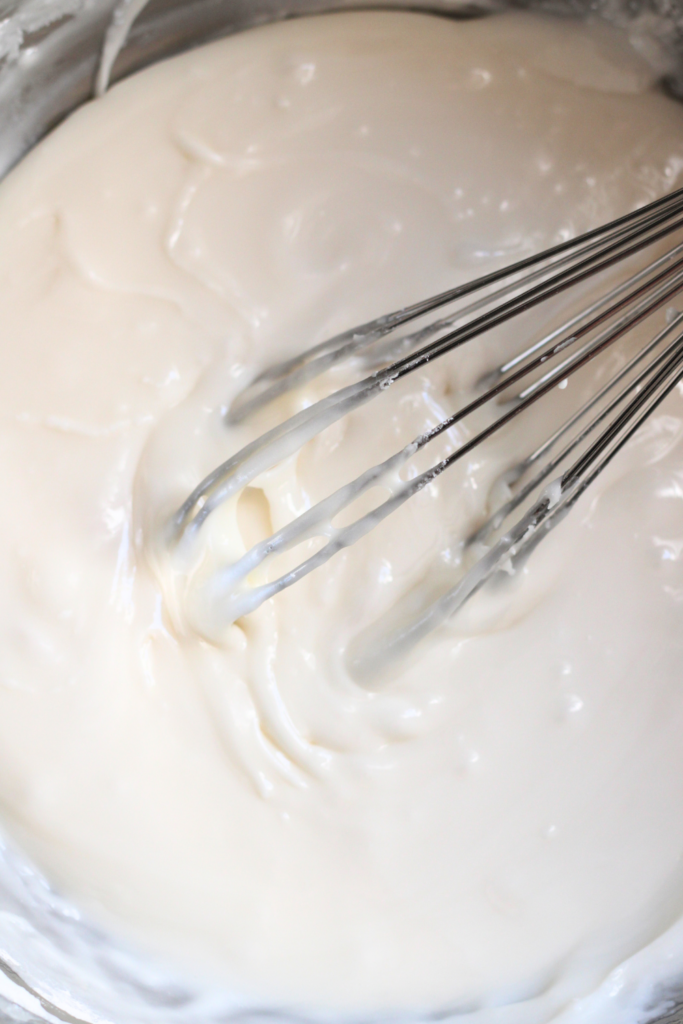
Prepare the white glaze: In a medium-sized bowl, whisk the confectioner’s sugar, light corn syrup, milk, salt, and vanilla together. It will be very thick and take a bit of elbow grease to work the corn syrup into the mixture. This is normal.
It will eventually even out and form a smooth, thick glaze comparable to what you would use to decorate gingerbread houses.
Prepare the black glaze: Remove one cup of the white glaze to a small bowl. Stir in the unsweetened cocoa powder until smooth, and no clumps remain. Set aside.
How to Glaze Black and White Cookies:
An angled decorating spatula is the best tool to use for this. If you don’t have one, you can use a butter knife.
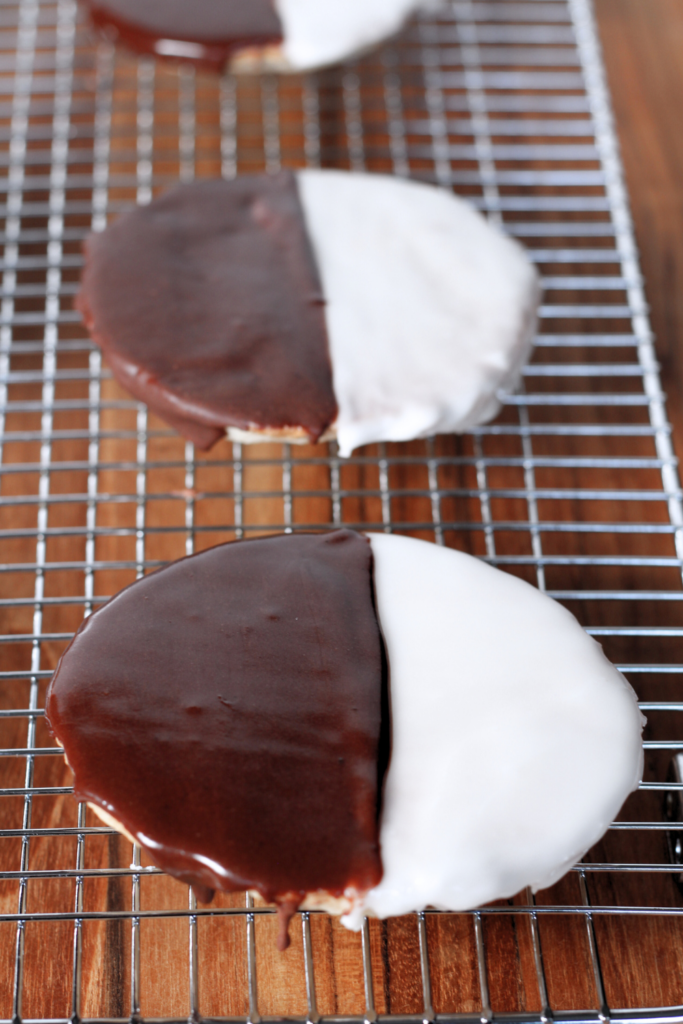
When the cookies are completely cold, scoop about a tablespoon or so of white glaze onto the flat, underside of the cookie. Do not glaze the rounded size.
Spread the glaze across half of the cookie, making a straight line down the center with the spatula. Don’t worry about it being perfectly straight; you can correct any defects by covering it with the black glaze later.
Place the partially glazed cookie on the cooling rack to dry. Repeat with each cookie. When you’re done, place the cooling rack back into the refrigerator for 15 minutes to harden.
When the white glaze has set, repeat the same procedure as above for each cookie, but using the “black” chocolate glaze. This time, the line down the center does matter. Take your time to make a straight line and make sure that both halves are relatively even in color.
Repeat for each cookie and place the cooling rack back into the refrigerator for about 30 minutes to allow the glaze to completely harden.
Storage: Wrap each cookie in plastic wrap for storage. Black and white cookies are best enjoyed at room temperature and can stay on the counter without declining in texture for up to 3 days. If your kitchen is very warm, keep the cookies in the refrigerator and remove them an hour before serving.
New York Black and White Cookies
These gigantic, soft New York black and white cookies are a staple in tri-state bakeries, bagel stores, and diners.
Ingredients
Cookies:
- 1 3/4 cups all-purpose flour
- 1/2 teaspoon baking powder
- 1/4 teaspoon baking soda
- 1/2 teaspoon salt
- 10 tablespoons unsalted butter, softened
- 1 cup granulated sugar
- 1 large egg
- 2 teaspoons vanilla extract
- 1/3 cup sour cream
Glaze:
- 5 cups confectioners’ sugar
- 9 tablespoons milk
- 2 tablespoons light corn syrup
- 1 teaspoon vanilla
- 1/2 teaspoon salt
- 3 tablespoons unsweetened cocoa powder
Instructions
Set up your oven: Move the racks to the middle and preheat the oven to 350 degrees F. Line 2 cookie sheets with parchment paper or use a silicone baking mat.
Cream the sugar and fats: Using the paddle attachment on a stand mixer, cream together the butter and granulated sugar on medium-high speed until light and fluffy – about 3 minutes.
Whisk the dry ingredients: In a separate bowl, whisk together the flour, baking powder, baking soda, and salt. Set aside.
Mix in the egg and vanilla: Turn the mixer off, add the egg and vanilla, and mix on low speed until well combined. Scrape down the bowl here and there, as needed.
Alternate adding flour and sour cream: Next, add the dry flour mixture a little at a time, alternating with the sour cream. Do this on the lowest speed just until no clumps of white flour remain. Do not overmix; turn the mixer off as soon as the flour is no longer white.
Scoop the dough: Grease a 1/4 cup-sized dry measuring cup. Scoop mounds of dough onto the cookie sheet. The dough will be very thick but appear more like a muffin batter than a true cookie dough - this is correct.
Place each mound about 3 to 4" apart from each other, and no more than 6 mounds on a baking sheet. They will spread out a lot.
Bake & Rest: Bake the cookies at 350 degrees F for about 17 minutes. Make sure to rotate the cookie sheet in the oven halfway through baking at 9 minutes.
They will have lightly browned edges, look underbaked in the centers, and be very pale when you take them out. This is what you want. The cookies will finish baking on the cookie sheet after they are removed from the oven.
Allow the cookies to rest undisturbed on the cookie sheet for 10 minutes. Transfer to a wire cooling rack after that time and allow to cool completely. If you want to glaze them sooner rather than later, place the cooling rack in the refrigerator.
Make the Glaze:
Prepare the white glaze: In a medium-sized bowl, whisk the confectioner's sugar, light corn syrup, milk, salt, and vanilla together. It will be very thick and take a bit of elbow grease to work the corn syrup into the mixture. This is normal.
It will eventually even out and form a smooth, thick glaze comparable to what you would use to decorate gingerbread houses.
Prepare the black glaze: Remove one cup of the white glaze to a small bowl. Stir in the unsweetened cocoa powder until smooth, and no clumps remain. Set aside.
How to Glaze Black and White Cookies:
An angled decorating spatula is the best tool to use for this. If you don't have one, you can use a butter knife.
When the cookies are completely cold, scoop about a tablespoon or so of white glaze onto the flat, underside of the cookie. Do not glaze the rounded size.
Spread the glaze across half of the cookie, making a straight line down the center with the spatula. Don't worry about it being perfectly straight; you can correct any defects by covering it with the black glaze later.
Place the partially glazed cookie on the cooling rack to dry. Repeat with each cookie. When you're done, place the cooling rack back into the refrigerator for 15 minutes to harden.
When the white glaze has set, repeat the same procedure as above for each cookie, but using the "black" chocolate glaze. This time, the line down the center does matter. Take your time to make a straight line and make sure that both halves are relatively even in color.
Repeat for each cookie and place the cooling rack back into the refrigerator for about 30 minutes to allow the glaze to completely harden.
Storage:
Wrap each cookie in plastic wrap for storage. Black and white cookies are best enjoyed at room temperature and can stay on the counter without declining in texture for up to 3 days. If your kitchen is very warm, keep the cookies in the refrigerator and remove them an hour before serving.
Recommended Products
This post may contain affiliate links, which means I may make a small commission at no extra cost to you.