Checkerboard Icebox Cookies
Last Updated on January 28, 2026 by Kiersten James
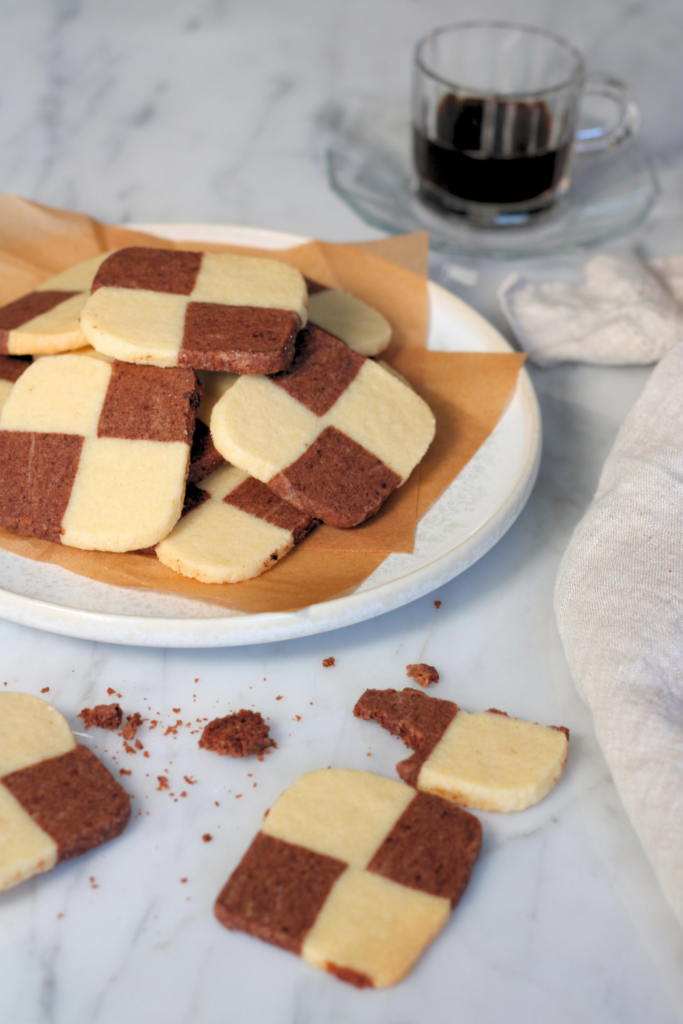
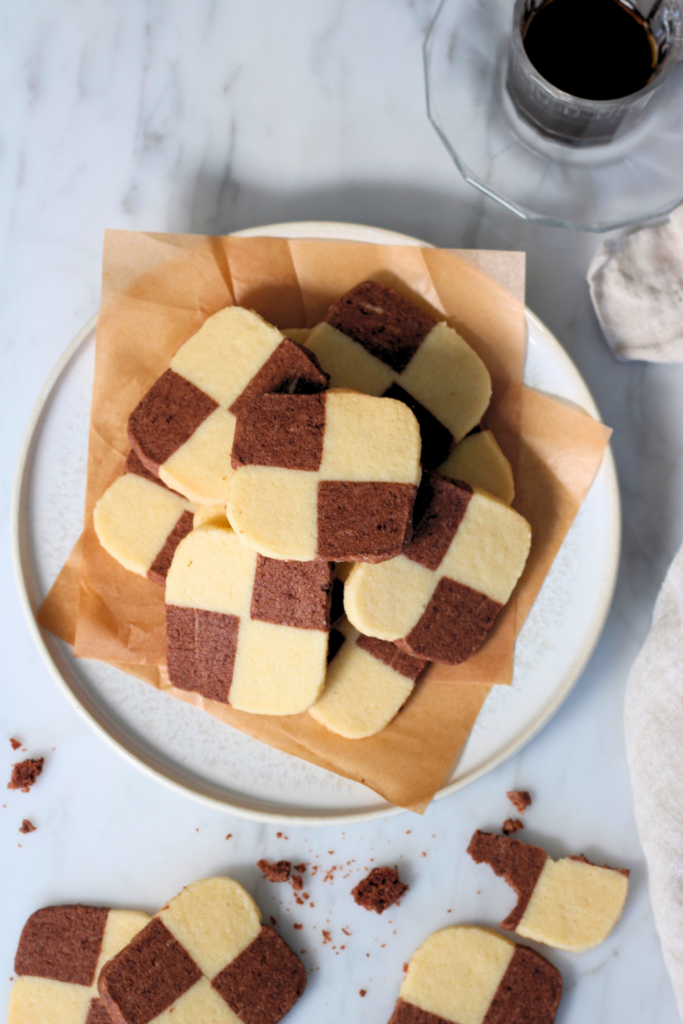
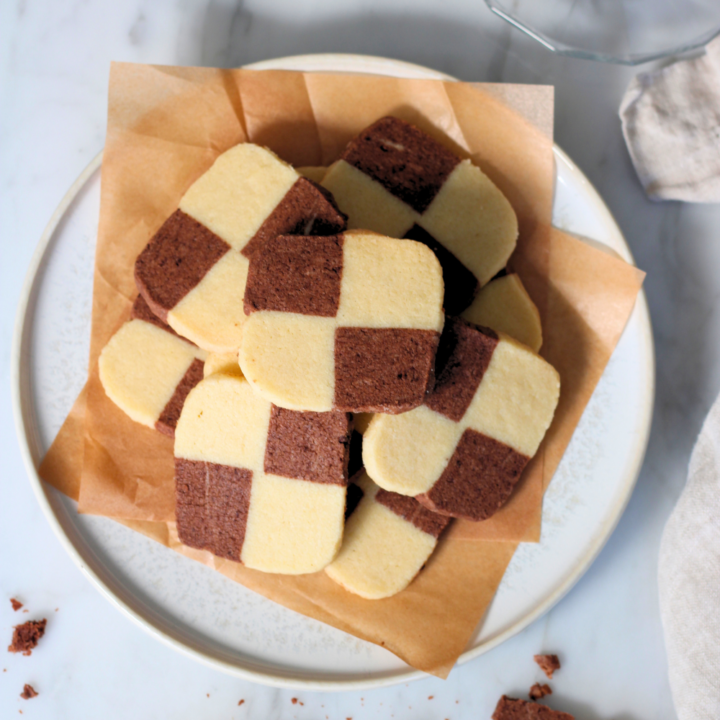
Classic NY bakery–style checkerboard cookies made with vanilla and chocolate icebox dough. These slice-and-bake cookies hold their shape, aren’t overly sweet, and look impressive without complicated decorating.
Checkerboard icebox cookies look fancy, but they’re actually one of those super-easy bakery tricks that make things look more impressive than they really are. If you can press dough into log shapes and stack them, you can make these.
These brown and white checkerboard cookies are crisp around the edges, tender in the middle, and lightly sweetened – much more shortbread than a sugar cookie.
They’re the kind of cookie you’ll find behind the glass at New York bakeries, stacked neatly in rows next to the raspberry-filled thumbprints and wide assortment of Italian butter cookies.
The dough is made all at once, then split into two equal portions. Half stays vanilla, the other half is turned into chocolate.
From there, you shape, chill, rotate, slice, and bake. There’s no decorating, piping, or potential for a mess.
Why You’ll Love These Checkerboard Icebox Cookies
- Crisp edges with a tender, shortbread-style bite
- Not overly sweet – perfect with coffee or espresso
- Classic NY bakery look without complicated decorating
- Slice and bake dough you can make ahead
- Holds its shape beautifully in the oven
Quick Allergy Check!
For my beloved friends who have different dietary needs, I see you and want you to feel safe.
These checkerboard icebox cookies contain the following allergens:
- Gluten
- Eggs
- Dairy
Ingredients You’ll Be Using:
Butter: Softened butter gives these cookies their smooth texture and clean snap. This cookie is more like a shortbread than a sugar cookie.
Granulated Sugar + Confectioners’ Sugar: Using both gives structure and tenderness. This combo helps the checkerboard pattern stay sharp after baking.
Egg Yolks: Yolks add richness without puffing the dough. It will help the clean, straight lines stay put in the pattern and shape.
Unsweetened Cocoa Powder: This gives the chocolate half of the dough a deep color without bitterness.
Semisweet Chocolate: Adds richness and helps the chocolate dough match the texture of the vanilla dough.
Tips for the Best Checkerboard Icebox Cookies Ever
You’ll make one base dough, then divide it.
Half stays vanilla. Half gets cocoa powder and melted chocolate mixed in.
Each dough is shaped into long rectangles, stacked to form a log, wrapped tightly in plastic wrap, and chilled until firm.
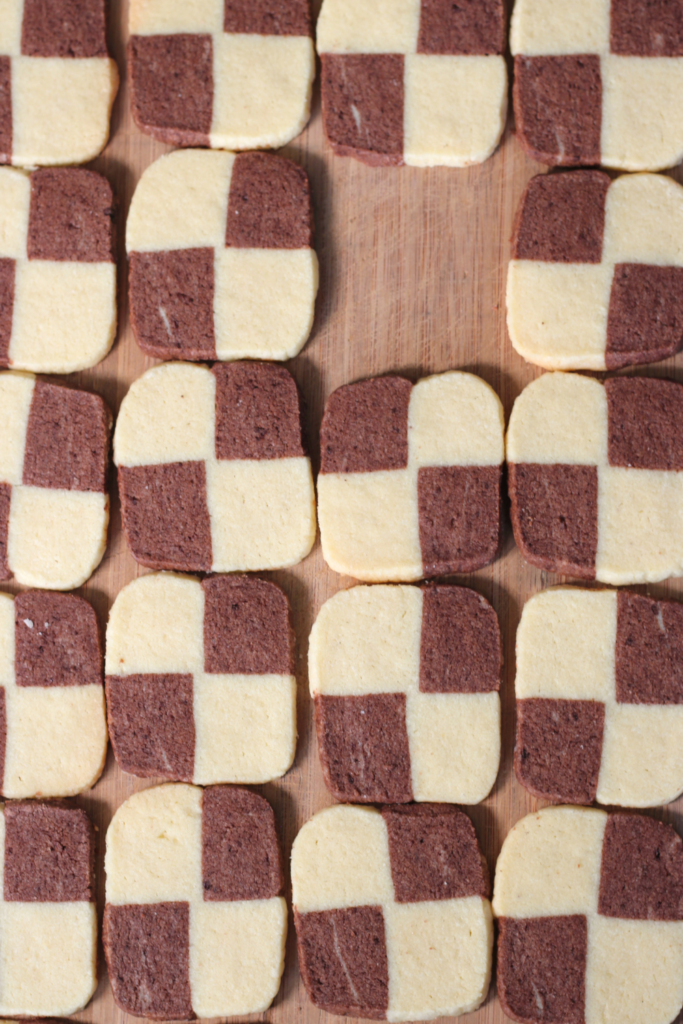
Once chilled, the log is sliced lengthwise, rotated, pressed back together to create the checkerboard pattern, then sliced into squares. (It seems like a lot of work, but it’s so easy!)
Do I really have to chill the dough for a few hours?
Yes! Don’t skip this! Cold dough is what keeps those clean, checkered lines. If the dough is soft, the pattern smears when slicing. Chill until firm and very hard, not just cool.
How do I keep the squares even?
Use a ruler and bench scraper when shaping the logs. Don’t overthink it!
Close is good enough here, and baking will prove to be very forgiving by evening it all out.
Do these spread?
Very little. They bake low and steady, so it’s fine to bake a full tray at once.
You can space them about an inch apart (much closer than drop cookies), which is great when baking multiple batches for a holiday.
How to Make Checkerboard Icebox Cookies
Equipment I Use:
- Stand Mixer
- Paddle Attachment
- LIFE CHANGING flour funnel my husband got for me
- Cookie Scoop (medium 2 tablespoon size)
- Baking Sheet
Ingredients:
- 2 sticks unsalted butter, softened (16 tablespoons)
- 3/4 cup granulated sugar
- 1/2 cup confectioner’s sugar
- 1/2 teaspoon salt
- 2 large egg yolks
- 2 teaspoons vanilla extract
- 2 1/4 cups all purpose flour
- 3 tablespoons semisweet chocolate, melted
- 2 tablespoons unsweetened cocoa powder
Overview:
Cream the sugar and fats: Using the paddle attachment on a stand mixer, cream together the butter, granulated sugar, confectioner’s sugar, and salt on medium-high speed until light and fluffy – about 3 minutes.
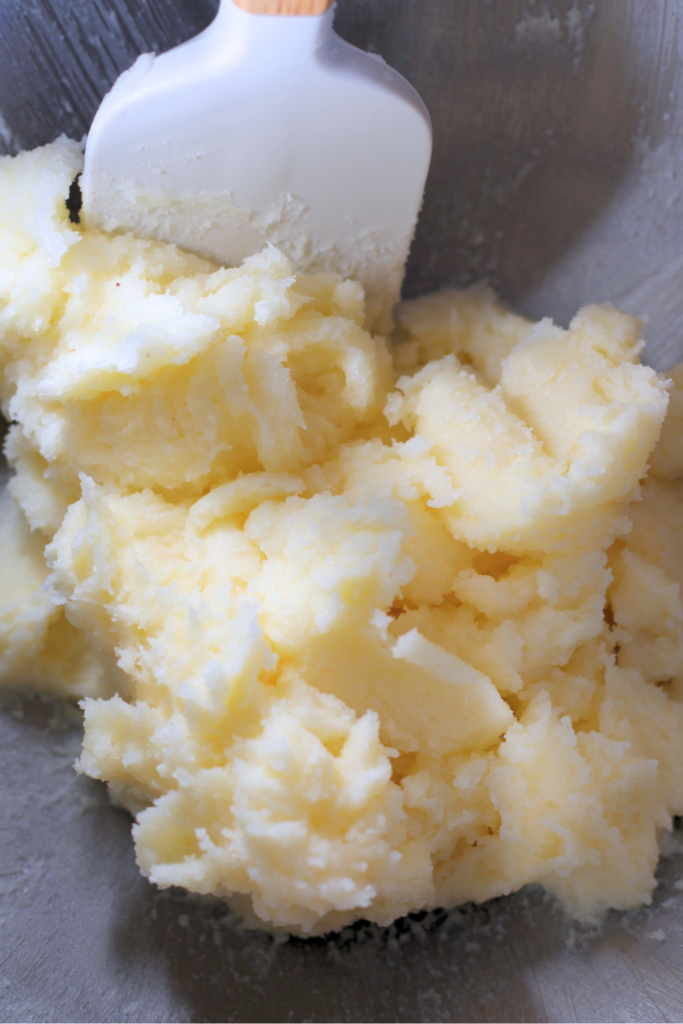
Add egg yolk and vanilla: Turn the mixer off, add the egg yolks and vanilla extract. Mix on low speed until well combined. Scrape down the bowl here and there, as needed.
Next, add the flour a little at a time, also on low speed, until no clumps of white flour remain. Do not overmix; turn the mixer off as soon as the flour is no longer white.
Divide the dough: Remove half of the dough to a separate bowl, leaving the other half in the mixing bowl. Both portions should be roughly 14.5 ounces.
Add the chocolate: Measure out 3 tablespoons of chocolate chips and melt them on low power in the microwave.
To the stand mixer bowl, add the unsweetened cocoa powder and melted chocolate. Mix on low speed until it has mostly come together, and the chocolate is evenly distributed.
If it still looks marbled, it’s ok to knead it a few times in the bowl with your hand to bring it all together.
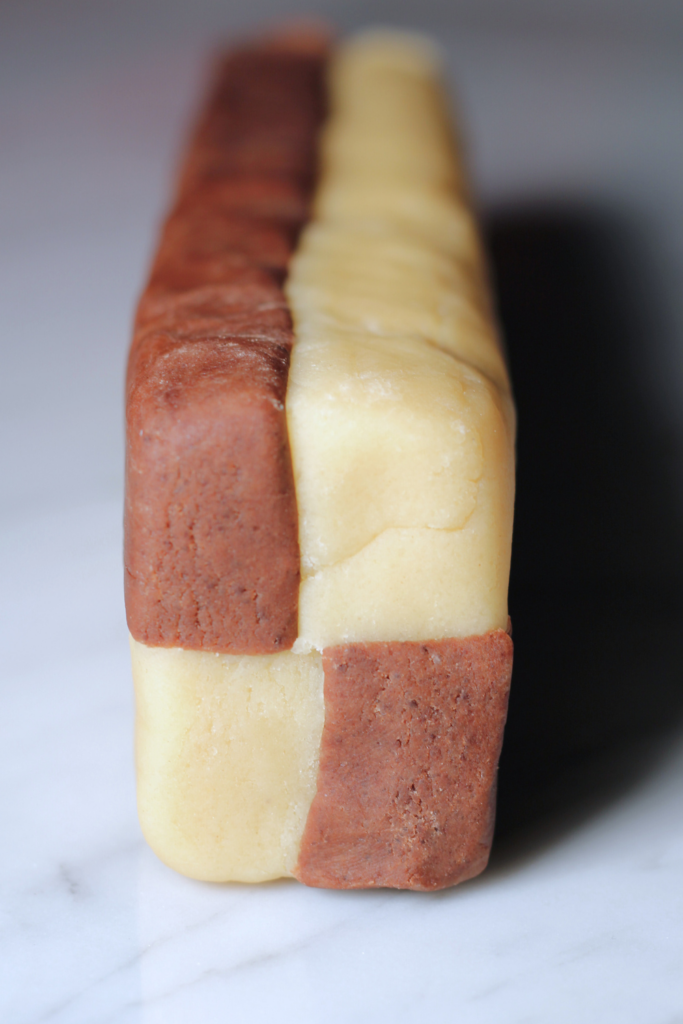
Shape & chill the logs: This is easiest to do with a bench scraper and a regular 12″ ruler. Press each portion of dough into a 10″ long by 2″ wide by 1″ high log.
If you don’t have a scraper or a ruler, you can press each log into sizes that are the same by eyeballing it; it just won’t be exact.
Place the vanilla dough log on top of the chocolate dough log to make one 2″ high log. Wrap the log very well in plastic wrap and allow it to chill in the refrigerator for at least 2 hours.
Set up your oven: When you’re ready to bake, move the racks to the middle and preheat the oven to 325 degrees F. Line 2 cookie sheets with parchment paper or use silicone baking mats.
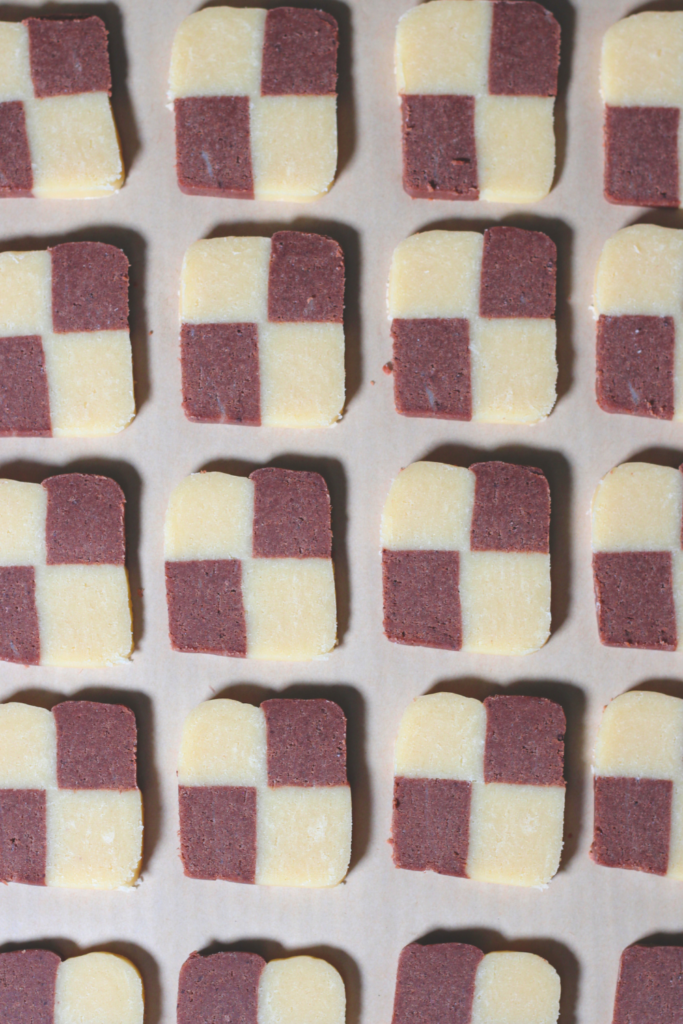
Make the checkerboard pattern: When the dough is very firm, unwrap it from the plastic and make one cut down the middle of the length of the log with a very sharp knife.
Rotate one of the halves upside down so that there is now a checkerboard appearance when looking at it from the side.
Press the dough edges gently together so that the dough halves adhere to each other.
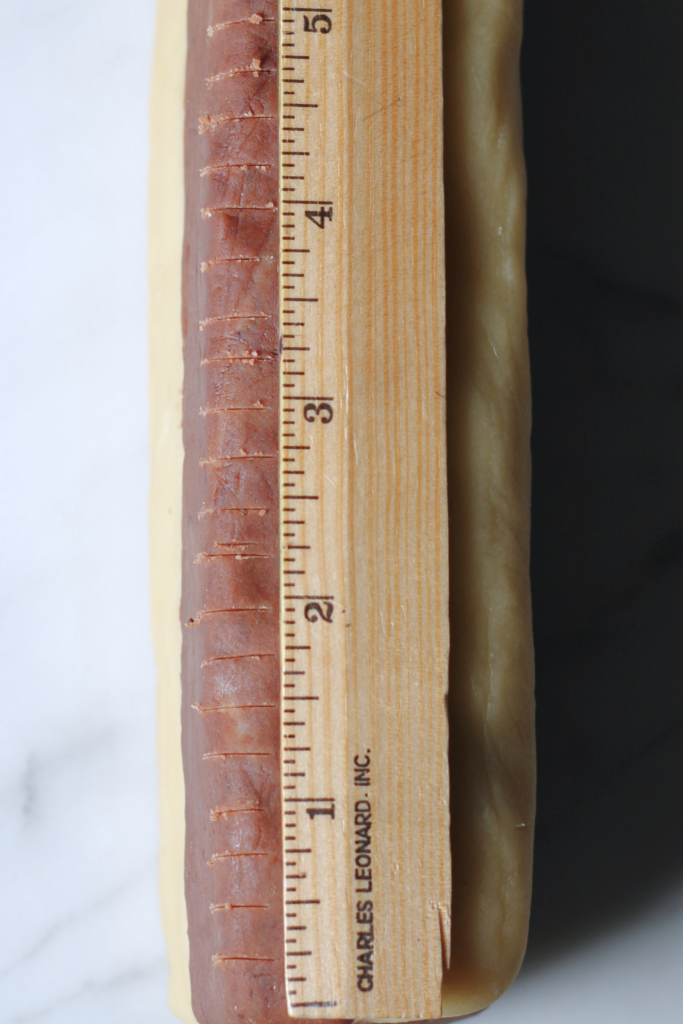
Slice the cookies: Slice the dough into 1/4″ cookies and place them 1″ apart on a lined baking sheet.
I’m really, really bad at eyeballing things and cutting them to be the same size, so I also use a ruler to help me with this. I make tick marks with the knife every 1/4″, then remove the ruler and slice away.
Bake & Rest: Bake the cookies at 325 degrees F for about 14 minutes, rotating the cookie sheet halfway through baking. They will have lightly browned edges when they’re done.
Allow the cookies to rest undisturbed on the cookie sheet for 10 minutes. Transfer to a wire cooling rack after that time and allow to cool completely.
Storage, Freezing & Make Ahead:
Baked checkerboard cookies keep best in an airtight container or metal cookie tin for 2 to 3 weeks, which is why bakeries love them!
Dough logs can be refrigerated for up to 3 days or frozen for up to 2 months. If freezing, wrap well in plastic wrap, then wrap in foil and label with the dough type and date.
Slice the cookies 1/4″ thick and bake straight from the freezer, adding 3 to 4 minutes to the bake time.
Checkerboard Icebox Cookies
Classic NY bakery style checkerboard cookies made with vanilla and chocolate icebox dough. These slice-and-bake cookies hold their shape, aren’t overly sweet, and look impressive without complicated decorating.
Ingredients
- 2 sticks unsalted butter, softened (16 tablespoons)
- 3/4 cup granulated sugar
- 1/2 cup confectioner's sugar
- 1/2 teaspoon salt
- 2 large egg yolks
- 2 teaspoons vanilla extract
- 2 1/4 cups all purpose flour
- 3 tablespoons semisweet chocolate, melted
- 2 tablespoons unsweetened cocoa powder
Instructions
Cream the sugar and fats: Using the paddle attachment on a stand mixer, cream together the butter, granulated sugar, confectioner's sugar, and salt on medium-high speed until light and fluffy - about 3 minutes.
Add egg yolk and vanilla: Turn the mixer off, add the egg yolks and vanilla extract. Mix on low speed until well combined. Scrape down the bowl here and there, as needed.
Next, add the flour a little at a time, also on low speed, until no clumps of white flour remain. Do not overmix; turn the mixer off as soon as the flour is no longer white.
Divide the dough: Remove half of the dough to a separate bowl, leaving the other half in the mixing bowl. Both portions should be roughly 14.5 ounces.
Add the chocolate: Measure out 3 tablespoons of chocolate chips and melt them on low power in the microwave.
To the stand mixer bowl, add the unsweetened cocoa powder and melted chocolate. Mix on low speed until it has mostly come together, and the chocolate is evenly distributed.
If it still looks marbled, it's ok to knead it a few times in the bowl with your hand to bring it all together.
Shape & chill the logs: This is easiest to do with a bench scraper and a regular 12" ruler. Press each portion of dough into a 10" long by 2" wide by 1" high log.
If you don't have a scraper or a ruler, you can press each log into sizes that are the same by eyeballing it; it just won't be exact.
Place the vanilla dough log on top of the chocolate dough log to make one 2" high log. Wrap the log very well in plastic wrap and allow it to chill in the refrigerator for at least 2 hours.
Set up your oven: When you're ready to bake, move the racks to the middle and preheat the oven to 325 degrees F. Line 2 cookie sheets with parchment paper or use silicone baking mats.
Make the checkerboard pattern: When the dough is very firm, unwrap it from the plastic and make one cut down the middle of the length of the log with a very sharp knife.
Rotate one of the halves upside down so that there is now a checkerboard appearance when looking at it from the side.
Press the dough edges gently together so that the dough halves adhere to each other.
Slice the cookies: Slice the dough into 1/4" cookies and place them 1" apart on a lined baking sheet.
I'm really, really bad at eyeballing things and cutting them to be the same size, so I also use a ruler to help me with this. I make tick marks with the knife every 1/4", then remove the ruler and slice away.
Bake & Rest: Bake the cookies at 325 degrees F for about 14 minutes, rotating the cookie sheet halfway through baking. They will have lightly browned edges when they're done.
Allow the cookies to rest undisturbed on the cookie sheet for 10 minutes. Transfer to a wire cooling rack after that time and allow to cool completely.
Storage, Freezing & Make Ahead:
Baked checkerboard cookies keep best in an airtight container or metal cookie tin for 2 to 3 weeks, which is why bakeries love them!
Dough logs can be refrigerated for up to 3 days or frozen for up to 2 months. If freezing, wrap well in plastic wrap, then wrap in foil and label with the dough type and date.
Slice the cookies 1/4" thick and bake straight from the freezer, adding 3 to 4 minutes to the bake time.
Recommended Products
This post may contain affiliate links, which means I may make a small commission at no extra cost to you.